Перейти до основного матеріалу

Як створити нагадування Outlook з електронної таблиці Excel?

У цій статті йдеться про створення нагадувань Outlook на основі даних електронної таблиці Excel.

Crete Outlook нагадування з таблиці Excel з кодом VBA


Створюйте нагадування Outlook з електронної таблиці Excel із кодом VBA

Якщо ви хочете створити нагадування Outlook з Excel, виконайте наступні дії.

1. Створіть аркуш, що містить заголовки стовпців та відповідні поля нагадування, як показано на знімку екрана нижче.

примітки: Для статус зайнятості стовпець, номер 2 означає, що нагадування відображатиметься як Зайнятий у календарі Outlook. Ви можете змінити його на 1 (попередньо), 3 (поза офісом), 4 (Робота в інших місцях)або 5 (безкоштовно) як вам потрібно.

2 Натисніть кнопку інший + F11 ключі, щоб відкрити Microsoft Visual Basic для додатків вікна.

3 В Microsoft Visual Basic для додатків вікна, натисніть Insert > Модулі. Потім скопіюйте код VBA у вікно коду.

Код VBA: Створення нагадувань Outlook з електронної таблиці Excel

Sub AddAppointments()
'Update by Extendoffice 20180608
    Dim I As Long
    Dim xRg As Range
    Dim xOutApp As Object
    Dim xOutItem As Object
    Set xOutApp = CreateObject("Outlook.Application")
    Set xRg = Range("A2:G2")
    For I = 1 To xRg.Rows.Count
        Set xOutItem = xOutApp.createitem(1)
        Debug.Print xRg.Cells(I, 1).Value
        xOutItem.Subject = xRg.Cells(I, 1).Value
        xOutItem.Location = xRg.Cells(I, 2).Value
        xOutItem.Start = xRg.Cells(I, 3).Value
        xOutItem.Duration = xRg.Cells(I, 4).Value
        If Trim(xRg.Cells(I, 5).Value) = "" Then
            xOutItem.BusyStatus = 2
        Else
            xOutItem.BusyStatus = xRg.Cells(I, 5).Value
        End If
        If xRg.Cells(I, 6).Value > 0 Then
            xOutItem.ReminderSet = True
            xOutItem.ReminderMinutesBeforeStart = xRg.Cells(I, 6).Value
        Else
            xOutItem.ReminderSet = False
        End If
        xOutItem.Body = xRg.Cells(I, 7).Value
        xOutItem.Save
        Set xOutItem = Nothing
    Next
    Set xOutApp = Nothing
End Sub

примітки: У наведеному вище коді, A2: G2 - це діапазон даних, на основі якого ви хочете створити зустрічі.

4 Натисніть кнопку F5 клавішу або натисніть кнопку Виконати, щоб запустити код. Тоді всі зустрічі з певними полями будуть відразу вставлені в календар вашого Outlook.

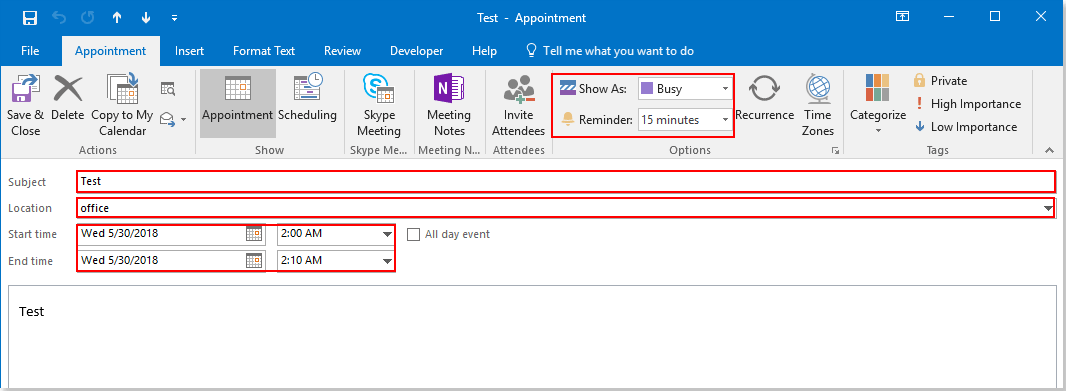
А потім ви можете перейти до календаря вашого прогнозу, щоб переглянути результати, див. Знімок екрана: 


Найкращі інструменти продуктивності офісу

Kutools для Outlook - Понад 100 потужних функцій, які покращать ваш Outlook

🤖 AI Mail Assistant: Миттєві професійні електронні листи з магією штучного інтелекту – геніальні відповіді одним клацанням, ідеальний тон, багатомовна майстерність. Трансформуйте електронну пошту без зусиль! ...

???? Автоматизація електронної пошти: Поза офісом (доступно для POP та IMAP)  /  Розклад надсилання електронних листів  /  Автоматична копія/прихована копія за правилами під час надсилання електронної пошти  /  Автоматичне пересилання (розширені правила)   /  Автоматично додавати привітання   /  Автоматично розділяйте електронні листи кількох одержувачів на окремі повідомлення ...

📨 Управління електронною поштою: Легко відкликайте електронні листи  /  Блокуйте шахрайські електронні листи за темами та іншими  /  Видалити повторювані електронні листи  /  розширений пошук  /  Консолідація папок ...

📁 Вкладення ProПакетне збереження  /  Пакетне від'єднання  /  Пакетний компрес  /  Автозавантаження   /  Автоматичне від'єднання  /  Автокомпресія ...

???? Магія інтерфейсу: 😊Більше красивих і класних смайликів   /  Підвищте продуктивність Outlook за допомогою вкладок  /  Згорніть Outlook замість того, щоб закривати ...

👍 Дива в один клік: Відповісти всім із вхідними вкладеннями  /   Антифішингові електронні листи  /  🕘Показувати часовий пояс відправника ...

👩🏼‍🤝‍👩🏻 Контакти та календар: Пакетне додавання контактів із вибраних електронних листів  /  Розділіть групу контактів на окремі групи  /  Видаліть нагадування про день народження ...

більше Особливості 100 Чекайте на ваше дослідження! Натисніть тут, щоб дізнатися більше.


Comments (66)
Rated 5 out of 5 · 2 ratings
This comment was minimized by the moderator on the site
How can I make this module run automatically when I close Excel? That way I can input data, and only have to close the file without having to manually run the code?
This comment was minimized by the moderator on the site
Hi JAIME GARCIA,
To make the AddAppointments subroutine run automatically when you close the Excel workbook, you can apply the following VBA code. This event is triggered right before the workbook is closed. Here's how you can adjust the code to run when the workbook is closed:
1. Open the Excel workbook where you want this functionality.
2. Press Alt + F11 to open the VBA editor.
3. In the Project Explorer on the left side, find ThisWorkbook under the VBAProject for your workbook.
4. Double-click ThisWorkbook to open its code module.
5. In the code window for ThisWorkbook, insert the following code.
6. Now you need to save this workbook as Excel Macro-Enabled Workbook (click File > Save As > choose Excel Macro-Enabled Workbook from Save as Type drop-down list > click Save).

Note: In this code, be sure to replace "SheetName" with the actual name of the worksheet containing your appointment data.

Private Sub Workbook_BeforeClose(Cancel As Boolean)
    AddAppointments
End Sub

Sub AddAppointments()
    ' Updated by Extendoffice 20180608
    Dim I As Long
    Dim xRg As Range
    Dim xOutApp As Object
    Dim xOutItem As Object
    Set xOutApp = CreateObject("Outlook.Application")
    Set xRg = ThisWorkbook.Sheets("SheetName").Range("A2:G2") ' Replace "SheetName" with the actual name of your sheet
    
    For I = 1 To xRg.Rows.Count
        Set xOutItem = xOutApp.createitem(1)
        xOutItem.Subject = xRg.Cells(I, 1).Value
        xOutItem.Location = xRg.Cells(I, 2).Value
        xOutItem.Start = xRg.Cells(I, 3).Value
        xOutItem.Duration = xRg.Cells(I, 4).Value
        xOutItem.BusyStatus = IIf(Trim(xRg.Cells(I, 5).Value) = "", 2, xRg.Cells(I, 5).Value)
        xOutItem.ReminderSet = xRg.Cells(I, 6).Value > 0
        xOutItem.ReminderMinutesBeforeStart = IIf(xOutItem.ReminderSet, xRg.Cells(I, 6).Value, 0)
        xOutItem.Body = xRg.Cells(I, 7).Value
        xOutItem.Save
        Set xOutItem = Nothing
    Next I
    Set xOutApp = Nothing
End Sub
This comment was minimized by the moderator on the site
Hello:

Thank you all for this amazing forum. I hope you will forgive me if this has already been asked, but is there a way to tweak the code to create an Outlook TASK instead of an appointment?

Please advise.

David
Rated 5 out of 5
This comment was minimized by the moderator on the site
How can I revise the code to include multiple rows?
This comment was minimized by the moderator on the site
HI Miller,

In this line Set xRg = Range("A2:G2") of the code, simply change the range "A2:G2" to a range containing multiple rows, such as "A2:G10"
This comment was minimized by the moderator on the site
This is a great tool. Was wondering if there is a way to add the appointments to a shared calendar, instead of my personal outlook calendar.
This comment was minimized by the moderator on the site
HI Crystal,
the code worked find, but I made some changes in Table & run the code again, now I have 2 reminders for same event, how to remove 1st reminder from my outlook calendar.
This comment was minimized by the moderator on the site
Hi Sushant Gawali,

The code only helps you to create reminders from Excel. If a duplicate reminder is created, you will need to go to the Outlook calendar to delete it manually. Sorry for the inconvenience.
This comment was minimized by the moderator on the site
If we share the excel with other user and they run this micro-enabled filed, will they have all the invites saved?
This comment was minimized by the moderator on the site
Hi,
If you save this Excel file as an Excel Macro-Enabled Workbook and send it to someone else, the invitation will be saved in their Outlook calendar after running the VBA code.
This comment was minimized by the moderator on the site
Excellent, thanks!
Rated 5 out of 5
This comment was minimized by the moderator on the site
Hi Crystal,

Thank you for letting me know.
This comment was minimized by the moderator on the site
Thank you for posting your code, it works perfectly for me for adding to Outlook. Is there a way to add it to a Google Calendar instead?

Thanks.
This comment was minimized by the moderator on the site
Hi David Ramsay,
I can’t fix this problem. Sorry about that.
This comment was minimized by the moderator on the site
Hello,

For some reason it won’t pull all dates.
My range is A2:C14 and it seems to cherry pick dates. Any tips?
This comment was minimized by the moderator on the site
Hi Hailey,
You may need to attach a screenshot or a sample file to describe the problem you encountered more clearly.
There are no comments posted here yet
Load More
Please leave your comments in English
Posting as Guest
×
Rate this post:
0   Characters
Suggested Locations