Перейти до основного матеріалу

Як створити командну кнопку для копіювання та вставки даних у Excel?

Припустимо, вам потрібно часто копіювати діапазон комірок в інше місце після зміни даних, метод ручного копіювання та вставки буде непомітним і трудомістким. Як зробити так, щоб цей процес копіювання та вставлення запускався автоматично? Ця стаття покаже, як за допомогою командної кнопки копіювати та вставляти дані лише одним клацанням миші.

Створіть кнопку команди, щоб скопіювати та вставити дані за допомогою коду VBA


Створіть кнопку команди, щоб скопіювати та вставити дані за допомогою коду VBA

Будь ласка, виконайте наступні дії, щоб автоматично копіювати та вставляти дані, натискаючи кнопку команди.

1. Вставте командну кнопку, клацнувши Розробник > Insert > Кнопка керування (керування ActiveX). Дивіться знімок екрана:
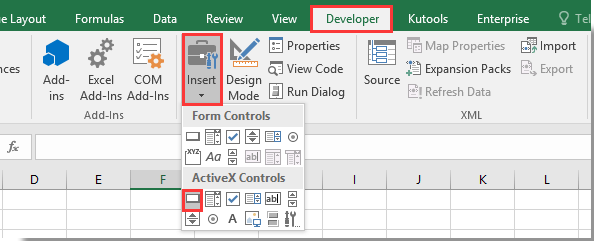
2. Намалюйте на своєму аркуші командну кнопку та клацніть правою кнопкою миші. Виберіть Переглянути код з контекстного меню.

3. У спливаючому Microsoft Visual Basic для додатків вікно, будь ласка, замініть оригінальний код у вікні коду на код VBA нижче.

Код VBA: Скопіюйте та вставте дані в Excel за допомогою командної кнопки

Private Sub CommandButton1_Click()
    Application.ScreenUpdating = False
    Dim xSheet As Worksheet
    Set xSheet = ActiveSheet
        If xSheet.Name <> "Definitions" And xSheet.Name <> "fx" And xSheet.Name <> "Needs" Then
            xSheet.Range("A1:C17 ").Copy
            xSheet.Range("J1:L17").PasteSpecial Paste:=xlValues, Operation:=xlNone, SkipBlanks:=False, Transpose:=False
        End If

    Application.ScreenUpdating = True
End Sub

примітки: У коді CommandButton1 - це назва вставленої кнопки Command. A1: C17 - діапазон, який потрібно скопіювати, а J1: L17 - діапазон призначення, щоб вставити дані. Будь ласка, змініть їх, як вам потрібно.

4. прес інший + Q клавіші, щоб закрити Microsoft Visual Basic для додатків вікно. І вимкніть Режим дизайну на вкладці Розробник.

5. Тепер натисніть кнопку команди, всі дані в діапазоні A1: C17 будуть скопійовані та вставлені в діапазон J1: L17 без форматування комірки.


Статті по темі:

Найкращі інструменти продуктивності офісу

🤖 Kutools AI Aide: Революціонізуйте аналіз даних на основі: Інтелектуальне виконання   |  Згенерувати код  |  Створення спеціальних формул  |  Аналізуйте дані та створюйте діаграми  |  Викликати функції Kutools...
Популярні функції: Знайдіть, виділіть або визначте дублікати   |  Видалити порожні рядки   |  Об’єднайте стовпці або клітинки без втрати даних   |   Раунд без Формули ...
Супер пошук: VLookup за кількома критеріями    Багатозначний VLookup  |   VLookup на кількох аркушах   |   Нечіткий пошук ....
Розширений розкривний список: Швидке створення випадаючого списку   |  Залежний спадний список   |  Виберіть розкривний список, що вибирається ....
Менеджер колонок: Додайте конкретну кількість стовпців  |  Перемістити стовпці  |  Перемкнути статус видимості прихованих стовпців  |  Порівняйте діапазони та стовпці ...
Особливості: Фокус сітки   |  Перегляд дизайну   |   Велика панель формул    Диспетчер робочих книг і аркушів   |  Бібліотека ресурсів (автотекст)   |  Вибір дати   |  Об’єднайте робочі аркуші   |  Шифрування/розшифрування клітинок    Надсилайте листи за списком   |  Супер фільтр   |   Спеціальний фільтр (фільтр жирний/курсив/закреслений...) ...
Топ-15 наборів інструментів12 текст Tools (додати текст, Видалити символи, ...)   |   50 + Графік типи (діаграма Ганта, ...)   |   40+ Практичний Формули (Розрахуйте вік на основі дня народження, ...)   |   19 вставка Tools (Вставте QR-код, Вставити зображення зі шляху, ...)   |   12 Перетворення Tools (Числа до слів, Валютна конверсія, ...)   |   7 Злиття та розділення Tools (Розширені комбіновані ряди, Розділені клітини, ...)   |   ... і більше

Покращуйте свої навички Excel за допомогою Kutools для Excel і відчуйте ефективність, як ніколи раніше. Kutools для Excel пропонує понад 300 додаткових функцій для підвищення продуктивності та економії часу.  Натисніть тут, щоб отримати функцію, яка вам найбільше потрібна...

Опис


Вкладка Office Передає інтерфейс із вкладками в Office і значно полегшує вашу роботу

  • Увімкніть редагування та читання на вкладках у Word, Excel, PowerPoint, Publisher, Access, Visio та Project.
  • Відкривайте та створюйте кілька документів на нових вкладках того самого вікна, а не в нових вікнах.
  • Збільшує вашу продуктивність на 50% та зменшує сотні клацань миші для вас щодня!
Comments (61)
Rated 4.5 out of 5 · 2 ratings
This comment was minimized by the moderator on the site
hello! have good day. i have a problem plz anyone could helpme. i have a data in my excel sheet. it has three types Plaining, Release and archive. I need a code such that when i click on Release the entire row cut from active sheet and pasted to another sheet i-e Released PR's. similarly when i click on archive the entire row cut from active PR's to Archived PR's sheet. i will be thank full if anyone help me as soon as possible.
Rated 4.5 out of 5
This comment was minimized by the moderator on the site
Hola, este mismo codigo funciona con power point? Pregunto por que necesito copiar y pegar la información de una diapositiva a otra. Muchas gracias.
This comment was minimized by the moderator on the site
Hi Ivan,
We only provide VBA scripts for Microsoft Excel, Word and Outlook. This VBA script does not apply to PowerPoint. Sorry for the inconvenience.
This comment was minimized by the moderator on the site
Cảm ơn bạn
Rated 4.5 out of 5
This comment was minimized by the moderator on the site
Cara, eu preciso copiar determinado dados, que são gerados todos os dias, mas salvos em planilhas diferentes, eu já criei a macro e salvei na PERSONAL, para conseguir usar em todas planilhas que abrir, mas não estou conseguindo colocar o código pra ele pegar esses dados, que se localizam sempre na mesma linha e coluna, ele sempre pega da planilha que eu realizei a macro, consegue me ajudar com isso ? Seria um código que sempre pega da planilha atual, aberta, e não da qual eu gravei a macro
This comment was minimized by the moderator on the site
Hi Gabriel,
If you need to copy data in different worksheets each time, you do not need to run the code with a command button.
After pressing the Alt + F11 keys to open the Basic Visual editor, click Insert > Module, and then copy the following VBA code into the Module (Code) window.
To copy data in any worksheet, you just need to open the worksheet, click Develper > macros to open the Macro window, select the macro name "CopyData" and then click the Run button to run the code.
https://www.extendoffice.com/images/stories/comments/comment-picture-zxm/copy_data.png

Sub CopyData()
    Application.ScreenUpdating = False
    Dim xSheet As Worksheet
    Set xSheet = ActiveSheet
        If xSheet.Name <> "Definitions" And xSheet.Name <> "fx" And xSheet.Name <> "Needs" Then
            xSheet.Range("A1:C17 ").Copy
            xSheet.Range("J1:L17").PasteSpecial Paste:=xlValues, Operation:=xlNone, SkipBlanks:=False, Transpose:=False
        End If

    Application.ScreenUpdating = True
End Sub
This comment was minimized by the moderator on the site
Hello,

I'm currently at using the following code:


Private Sub CommandButton1_Click()
Dim xSWName As String
Dim xSheet As Worksheet
Dim xPSheet As Worksheet
Dim xIntR As Integer
xSWName = "Aktiva"
On Error Resume Next
Application.ScreenUpdating = False
Set xSheet = ActiveSheet
If xSheet.Name <> "Definitions" And xSheet.Name <> "fx" And xSheet.Name <> "Needs" Then
xSheet.Range("A6:F60 ").Copy
Set xPSheet = Worksheets.Item(xSWName)
xPSheet.Cells.PasteSpecial Paste:=xlValues, Operation:=xlNone, SkipBlanks:=False, Transpose:=False
End If
Application.ScreenUpdating = True
End Sub


But I would it to copy the text to the next empty cell, currently it just pastes it at the top and overwrites what's currently there.
Can someone help me, so that when I use this "script/marco" it goes to the next possible empty space?

Thanks in advance,
Calle
This comment was minimized by the moderator on the site
Hi Calle,
Do you want to fill blank cells with value above in a certian range in Excel?
If so, perhaps the methods in this post can do you a favor.
How To Fill Blank Cells With Value Above / Below / Left / Right In Excel?
If I am not understanding correctly, please attach a screenshot of your data to describe it more clearly.
This comment was minimized by the moderator on the site
Please excuse me, I found my omission...

On the other hand, this soul generates a mail per recipient whereas I wish to write a single email (grouped) to all the recipients. I can't find what to change...
Could you help me in solving this problem please?

Thank you again for your help,
Cordially. Have a good day.
This comment was minimized by the moderator on the site
Hi Clément,
To avoid this error "Dim xOutApp As Outlook.Application" -> Undefined user-defined type, you need to check the Microsoft Outlook 16.0 Object Library box as shown in the screenshot above.
The above VBA code helps to create a separate email to each recipient listed in cells.
If you want to create a single email with all email addresses displayed in the Recipients field (see screenshot below), the following VBA code can help you to do it.
https://www.extendoffice.com/images/stories/comments/comment-picture-zxm/button_email.png
Private Sub CommandButton1_Click()
'updateby Extendoffice 20220901
    Dim xOTApp As Object
    Dim xMItem As Object
    Dim xCell As Range
    Dim xRg As Range
    Dim xEmailAddr As String
    Dim xTxt As String
    On Error Resume Next
    xTxt = ActiveWindow.RangeSelection.Address
    Set xRg = Range("A1:A3")
    If xRg Is Nothing Then Exit Sub
    Set xOTApp = CreateObject("Outlook.Application")
    For Each xCell In xRg
        If xCell.Value Like "*@*" Then
            If xEmailAddr = "" Then
                xEmailAddr = xCell.Value
            Else
                xEmailAddr = xEmailAddr & ";" & xCell.Value
            End If
        End If
    Next
    Set xMItem = xOTApp.CreateItem(0)
    With xMItem
        .To = xEmailAddr
        .Subject = "Test"
        .Body = "Dear " _
                & vbNewLine & vbNewLine & _
                "This is a test email " & _
                "sending in Excel"
        .Display
    End With
End Sub
This comment was minimized by the moderator on the site
Thanks !
I made it but I have an error on this line : "Dim xOutApp As Outlook.Application" -> Undefined user-defined type

I don't understand because I made steps described in your message... Can you help me again please ? :-/


Thanks a lot !
This comment was minimized by the moderator on the site
Hi there ! Great page, very practical for me... !
Is it posible to copy datas (a list of mails) and paste it directly in "recipients" on Outlook ? If it's possible, I don't know how to do it...

Can you help me please ?
This comment was minimized by the moderator on the site
Hi Clement,
If you want to click a button then copy a list of email addresses and paste them directly in the "To" field in Outlook. The following VBA code can help.
After adding the code, please click Tools > Reference, then check the Microsoft Outlook 16.0 Object Library box.
https://www.extendoffice.com/images/stories/comments/comment-picture-zxm/outlook_object_library.png

Private Sub CommandButton1_Click()
'Updated by Extendoffice 20220831
    Dim xRg As Range
    Dim xRgEach As Range
    Dim xRgVal As String
    Dim xAddress As String
    Dim xOutApp As Outlook.Application
    Dim xMailOut As Outlook.MailItem
    On Error Resume Next
    xAddress = ActiveWindow.RangeSelection.Address
    Set xRg = Range("A1:A3")
    If xRg Is Nothing Then Exit Sub
    Application.ScreenUpdating = False
    Set xOutApp = CreateObject("Outlook.Application")
    Set xRg = xRg.SpecialCells(xlCellTypeConstants, xlTextValues)
    For Each xRgEach In xRg
        xRgVal = xRgEach.Value
        If xRgVal Like "?*@?*.?*" Then
            Set xMailOut = xOutApp.CreateItem(olMailItem)
            With xMailOut
                .To = xRgVal
                .Subject = "Test"
                .Body = "Dear " _
                      & vbNewLine & vbNewLine & _
                        "This is a test email " & _
                        "sending in Excel"
                .Display
                '.Send
            End With
        End If
    Next
    Set xMailOut = Nothing
    Set xOutApp = Nothing
    Application.ScreenUpdating = True
End Sub
This comment was minimized by the moderator on the site
Hi
i need to insert a button in each row to copy the specific cell rage on the row and past it on different excel in one drive , Ex, multiple teacher working on excel and entering the student date and click the button ( post button ) once they click the date has to be actively updated in student master file in new row, (its like a dynamic consolidation of work )

If Teacher is correcting the row and clicking the post button again it needs to be verify the cell which has unique id for the student and replace the row in master file not to create duplicate row on master file on each click , i need last updated date and time on the master file in separate cell at the end of the row
This comment was minimized by the moderator on the site
Hi suriya prakash,
I am very sorry that I cannot help you with this issue yet.
This comment was minimized by the moderator on the site
In case when I am copying from one sheet to another using the below code (Using Shape - Not Button) The Value From "ToCopySHEET"!A14 is copied to J7 when the A1:A6 are Used Range but J column is empty. I want to copy it into J:J irrespective the A, B or any other column is Used but If J is vacant It must start from the first empty cell of "CopiedSHEET"!J:J.


Sub CopyToSheet()
'Updated by Extendoffice 20220729
Dim xSWName As String
Dim xSheet As Worksheet
Dim xPSheet As Worksheet
Dim xIntR As Integer
xSWName = "Copy Test Page"
On Error Resume Next
Application.ScreenUpdating = False
Set xSheet = ActiveSheet
If xSheet.Name <> "Definitions" And xSheet.Name <> "fx" And xSheet.Name <> "Needs" Then
xSheet.Range("A14").Copy
Set xPSheet = Worksheets.Item(xSWName)
xIntR = xPSheet.UsedRange.Rows.Count
xPSheet.Cells(xIntR + 1, 10).PasteSpecial Paste:=xlValues, Operation:=xlNone, SkipBlanks:=False, Transpose:=False
End If
Application.ScreenUpdating = True
End Sub
There are no comments posted here yet
Load More
Please leave your comments in English
Posting as Guest
×
Rate this post:
0   Characters
Suggested Locations